
Photo credit Ajeet Mestry
Article Updated: June. 4, 2019
Introduction
Commonly, people (me included) will jump to a coded or complex solution in SharePoint. I wanted to test myself to come up with a nice out-of-the-box (OOTB) solution that would provide value to an organization.
Recently, a colleague asked me if it was possible to assign corporate badges to employees in O365. So, I took that as my out-of-the-box challenge.
Scenario
A company assigns awards to employees for completing certain tasks or training in the form of digital badges.
The company wishes to have a site linked off their Human Resources or Training site for users to check their badges and view recently earned badges by other employees.
All employees will be able to view the “Awards site” and only a small number of users will have access to edit items on the site.
My Awards
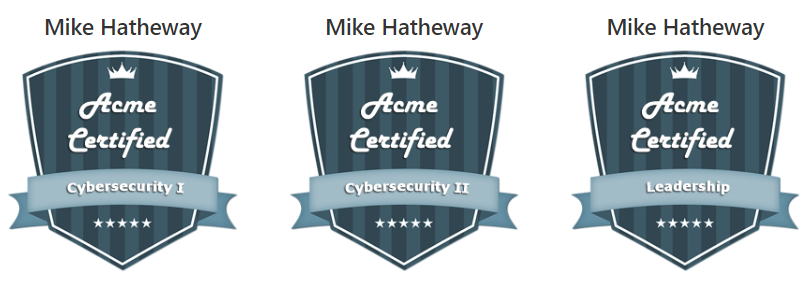
Recent Awards

Setup
The setup for this project was reasonably simple. I used some content types and site columns, but for simplicity, I will just use list columns in the example here.
- Site
- Type: Communications Site
- Name: Awards
- URL: /sites/awards/
- Security:
- Visitors Group: Everyone except external
- Members Group: [Anyone needed to add badges and awards]
On the Awards site, I added the following
- Document Library
- Name: BadgeImages
- List
- Name: Badges
- List
- Name: Awards
BadgeImages Document Library
First, I know BadgeImages is a terrible name. Once you name it BadgeImages you can go into the Library properties and change it to something you like better. Changing the name will leave the URL as-is. I prefer not to use spaces in initial library names to avoid the %20 in the URL.
The BadgeImages library is used to house the images of the badges. There were no columns added to this library.

Badges List
When created, the Badges list will come with a Title column. We will use this for the Badge title.
The only other piece of data we need for this library is the name of the image that is associated with the Badge. I added a new Text column called ImageName. This relates to the filename of the badge image that was added in the BadgeImages document library. Again, if you hate that I didn’t add a space between “Image” and “Name” feel free to change it after setting it initially.

Awards List
The awards list was the most difficult list to configure.
Initially, I added a Person column called AwardedTo and a Lookup column called Award. For the Award column, I selected the Badges list as the “Get information from” list, the “Title” column as the “In this column” value, and for “additional fields I selected “ImageName”

Next, I realized that I didn’t need the Title column, so I went into List Settings > Advanced settings and set “Allow management of content types?” to Yes. While I was in the Advanced settings, I also disabled Attachments on the list.
Then under List Settings, I clicked on the content types “Item”, selected “Title” and set the Column setting to “Hidden”. While I was in this screen I also set Award and AwardedTo to Required.
After the fields were behaving the way I wanted it was back to List Settings > Advanced settings and set “Allow management of content types?” to No. This allows us to hide the Title without showing the Content Type box on the forms.
Then I started adding some items:

And here is how that looks in SharePoint…
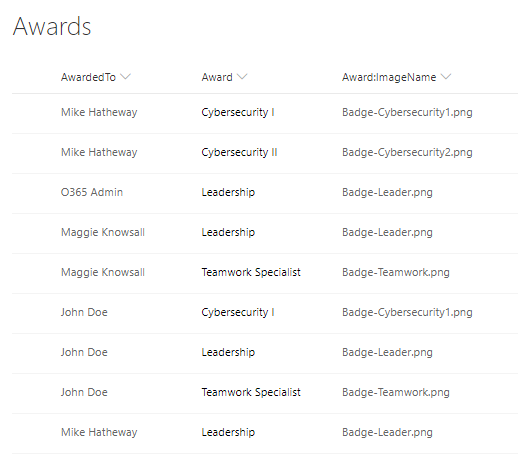
<record needle scratch sound />
Well, that’s boring. Let’s kick it up a notch.
If you click the down arrow on the Award:ImageName column and select Column Settings > Format this column you are able to add JSON to the column to add some fancy formatting. I added the following:
{
  "$schema": "https://developer.microsoft.com/json-schemas/sp/column-formatting.schema.json",
  "elmType": "img",
  "attributes": {
    "src": "=@currentWeb + '/BadgeImages/' + @currentField "
  },
  "style": {
    "width": "250px",
    "height": "244px"
  }
}
The outcome here is that it replaces the column containing the image name with the HTML for an image and sets the source property on that HTML tag.
The updated column:
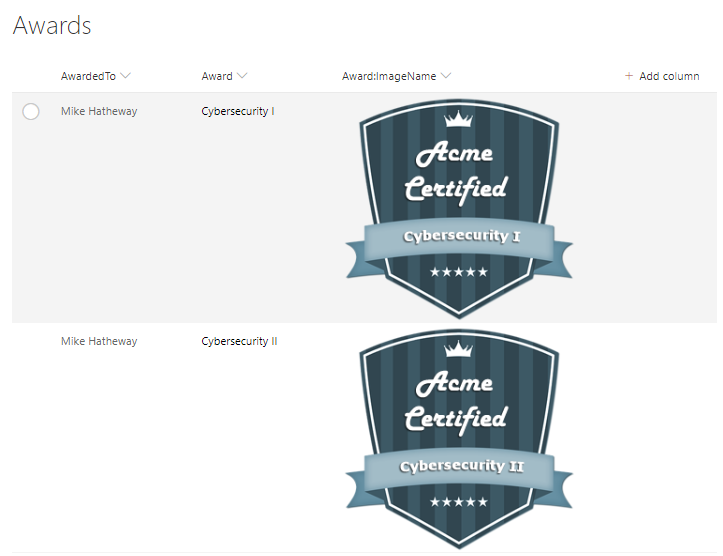
That looks ok. We could probably stop there, but since I did say there was a requirement to show “My Awards” and “Recent Awards”, let’s show how to create those views.
Select the View selector > Save View As and type My Awards (public view). Then select the View selector > Edit Current View. Scroll down to the Filter section and set the filter to “AwardedTo is equal to [Me]”.

Select OK at the bottom of the page.
Now when you view the My Awards view you should only see your user’s badges.
But let’s kick it up another notch.
Select the View selector > Format this view and add this JSON
{
  "schema": "https://developer.microsoft.com/json-schemas/sp/view-formatting.schema.json",
  "hideSelection": true,
  "hideListHeader": true,
  "rowFormatter": {
    "elmType": "div",
    "style": {
      "display": "flex",
      "float": "left",
      "flex-wrap": "wrap",
      "flex-direction": "column",
      "align-items": "center",
      "justify-content": "space-around",
      "min-width": "300px",
      "max-width": "300px",
      "min-height": "286px"
    },
    "children": [
      {
        "elmType": "div",
        "style": {
          "text-align": "center"
        },
        "children": [
          {
            "elmType": "div",
            "style": {
              "font-weight": "500",
              "font-size": "1.5rem"
            },
            "txtContent": "[$AwardedTo.title]"
          }
        ]
      },
      {
        "elmType": "div",
        "children": [
          {
            "elmType": "img",
            "attributes": {
              "src": "=@currentWeb+'/BadgeImages/'+[$Award_x003a_ImageName]"
            },
            "style": {
              "width": "250px",
              "height": "244px"
            }
          }
        ]
      }
    ]
  }
}
For the Recent Awards view go back to the All Items view, select the View selector > Save View As and type Recent Awards (public view). Then select the View selector > Edit Current View. Scroll down to the Sort section and set the filter to “Created descending”. Then scroll to the Item Limit section, expand it and set the number of items to 6 (limit).


Select the View selector > Format this view and add this JSON
{
  "schema": "https://developer.microsoft.com/json-schemas/sp/view-formatting.schema.json",
  "hideSelection": true,
  "hideListHeader": true,
  "rowFormatter": {
    "elmType": "div",
    "style": {
      "display": "flex",
      "float": "left",
      "flex-wrap": "wrap",
      "flex-direction": "column",
      "align-items": "flex-start",
      "justify-content": "space-around",
      "min-width": "250px",
      "max-width": "250px",
      "min-height": "244px"
    },
    "children": [
      {
        "elmType": "div",
        "style": {
          "text-align": "center"
        },
        "children": [
          {
            "elmType": "div",
            "style": {
              "font-weight": "500",
              "font-size": "1rem"
            },
            "txtContent": "[$AwardedTo.title]"
          },
          {
            "elmType": "img",
            "attributes": {
              "src": "=@currentWeb+'/BadgeImages/'+[$Award_x003a_ImageName]"
            },
            "style": {
              "width": "250px",
              "height": "244px"
            }
          }
        ]
      }
    ]
  }
}
Adding to the Homepage
By using the List webpart you should be able to add these to the homepage of the Awards site.
I chose a 1/3 left and 2/3 right layout. I added the List web part to both columns. I selected the Awards list for both and set the view property of the left column to show the My Awards View and the right column to show the Recent Badges View.

Note: There seems to be a bug in the List web part for views using “float: left” where the first row seems to add some additional top padding to some elements. I’m sure this will be addressed in a SharePoint update.
Conclusion
By using the tools supplied in the out-of-the-box SharePoint user interface you are able to create a nice-looking functional interface.
Links
For more information on Column and View formatting check out the following articles on the Microsoft Docs site:
- https://docs.microsoft.com/en-us/sharepoint/dev/declarative-customization/column-formatting
- https://docs.microsoft.com/en-us/sharepoint/dev/declarative-customization/view-formatting
And some awesome Column and View samples from the community on Github:


Hi Mike, this is lovely – do these badges get automatically assigned upon completing an action?
LikeLike